Hello Everyone!
I can't believe that it is already almost time to start October, my where has the time gone? I haven't blogged in awhile, I guess you could call it a little break? I have been very busy since I last posted. I am still working in the gardens with upkeep now that Fall has arrived. I am working on my shade garden bed under the weeping willow and it is coming along well. All the rabbits and chicks are doing very well. And last but not least, my most exciting accomplishment . . . . . I am in my fourth week of classes to become a Master Gardener! I am so excited and the classes are amazing! I am learning so much I can't believe it!
I hope all is going well in your neck of the woods!
Happy Gardening!
Mindy
Sunday, September 30, 2012
Sunday, August 19, 2012
A TRIP TO THE GARDEN, CHICK STYLE
With our temperatures in the 80's this weekend, we decided to get the chicks accustomed to the outdoors a bit! Since my garden is fenced in, we took them there so we could watch over them a bit easier. My girls helped me keep an eye on them. 
They were very curious of all of their surroundings! 


About two or three more weeks in the brooder and they will be ready for their new outside home and coop! Happy Gardening!
Mindy
Sunday, August 12, 2012
AN UPDATE ON THE CHICKS
We took the chicks on a small outing to my garden on Thursday, 08/09/12. They had a fun time, however, we decided it was a bit too hot and humid so we cut it short so we would not stress them!


This little chicks name is Toy, she is really a sweetie! This is the chick my daughter has been working with to tame.

Well the chicks are growing very quickly. They are very curious and are even trying to use their wings a bit! We now have a screen over the top of their newly enlarged brooder. Their first week the temperature in their breeder needed to stay at 95 degrees. Starting on Monday we will keep the temperature at 90 degrees. We will decrease it by 5 degrees each week until they are ready to go outside at approximately five weeks!


This little chicks name is Toy, she is really a sweetie! This is the chick my daughter has been working with to tame.
Happy Gardening and Farming! We will keep updating the status of the chicks on their journey!
Mindy
Tuesday, August 7, 2012
MY EXCITING NEW ARRIVALS!
The post office called me this morning to get me the time that my chicks would be available to be picked up! We ordered them from Meyer Hatchery and boy did they get here quick! They were hatched on Monday and I received them on Tuesday! Meyer Hatchery is great about allowing small orders, with the minimum order being three chicks this time of the year!

We had the brooder all ready and waiting for the chicks arrival! We have all of the necessities, including a heat lamp with a red bulb. They require 95 degree temperatures for their frst week.

The chicks took well to eating and drinking, which is a very good sign! No troubles so far. They are very entertaining to watch.

After their long journey, they all took a nap! How cute!

We look foward to watching these little girls grow up, it is hard to believe some day soon they will be laying some yummy brown eggs for us!
Happy Gardening and Farming!
Mindy
Thursday, August 2, 2012
PICKIN' CHICKENS!
 With a lot of hard work, research, and much anticipation, our chicken coop is built and our chicks have been ordered. Our dreams of collecting fresh eggs are steps closer to becoming a reality. Even though there is still work to be done in receiving and raising up our day old chicks, our dreams are one step closer.
In the days prior to this, there has been a lot of research done including research on chicken coop requirements, coop location, and chicken care. Another important part of raising chickens is deciding the breed for you. We will be raising hens for egg-laying. In our decision making process, when researching different breeds, we took into consideration only breeds that were heat and cold tolerant to our location in southern Indiana. Due to the size of our coop, we decided we would need a smaller sized hen. We also had a preference of having the largest brown eggs that we could get and still fulfill the above issues.
The chick we picked was the GOLDEN BUFF, AKA Red Sex Link. This breed is one of the most exceptional brown egg layers. They lay large brown eggs and the hens weigh around four pounds. This was our chick!

There are many hatcheries you can order from and have your chicks delivered to your local post office. In the spring you can also get chicks from many farm stores. We have ordered our chicks from Meyer Hatchery. They will be arriving next week! How exciting! I will keep you posted on their arrival and our progress!
Happy Gardening and Farming!
Mindy
Tuesday, July 31, 2012
AND THE FARM GROWS AGAIN! SHADE GARDEN ADDITION
OUR MINI FARM GROWING AGAIN!
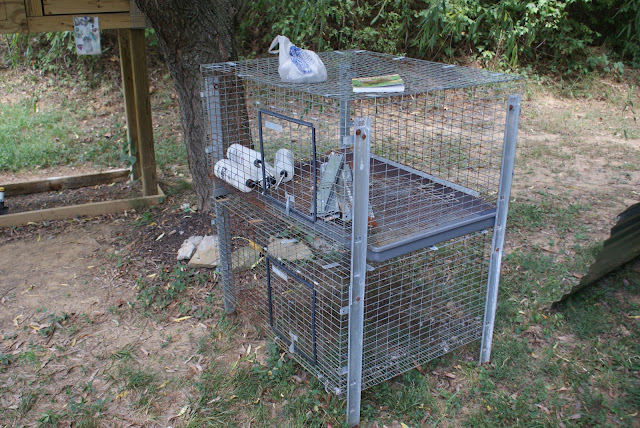
With a slight break in the temps this weekend, my very talented husband finished the new addition to our mini farm! My brother had given us a set of cages he received for free from a friend of his, and my husband's mind started working!
Here are the cages as we received them:
We then decided to move the location of Oreo and Daisy's cage in order for the larger addition to fit in this location well! We also had this small dog fence on our property as well. It had some vining weeds growing through it and my daughter worked to remove those. We are not sure if we like the fence in this area or not, we are giving it some time to see if it grows on us. If we keep the fence there, it will be an area for the bunnies to get some exercise and somewhat of a safe haven for the chickens. My husband had mentioned something about eventually building an enclosed area here, instead of using the fence.

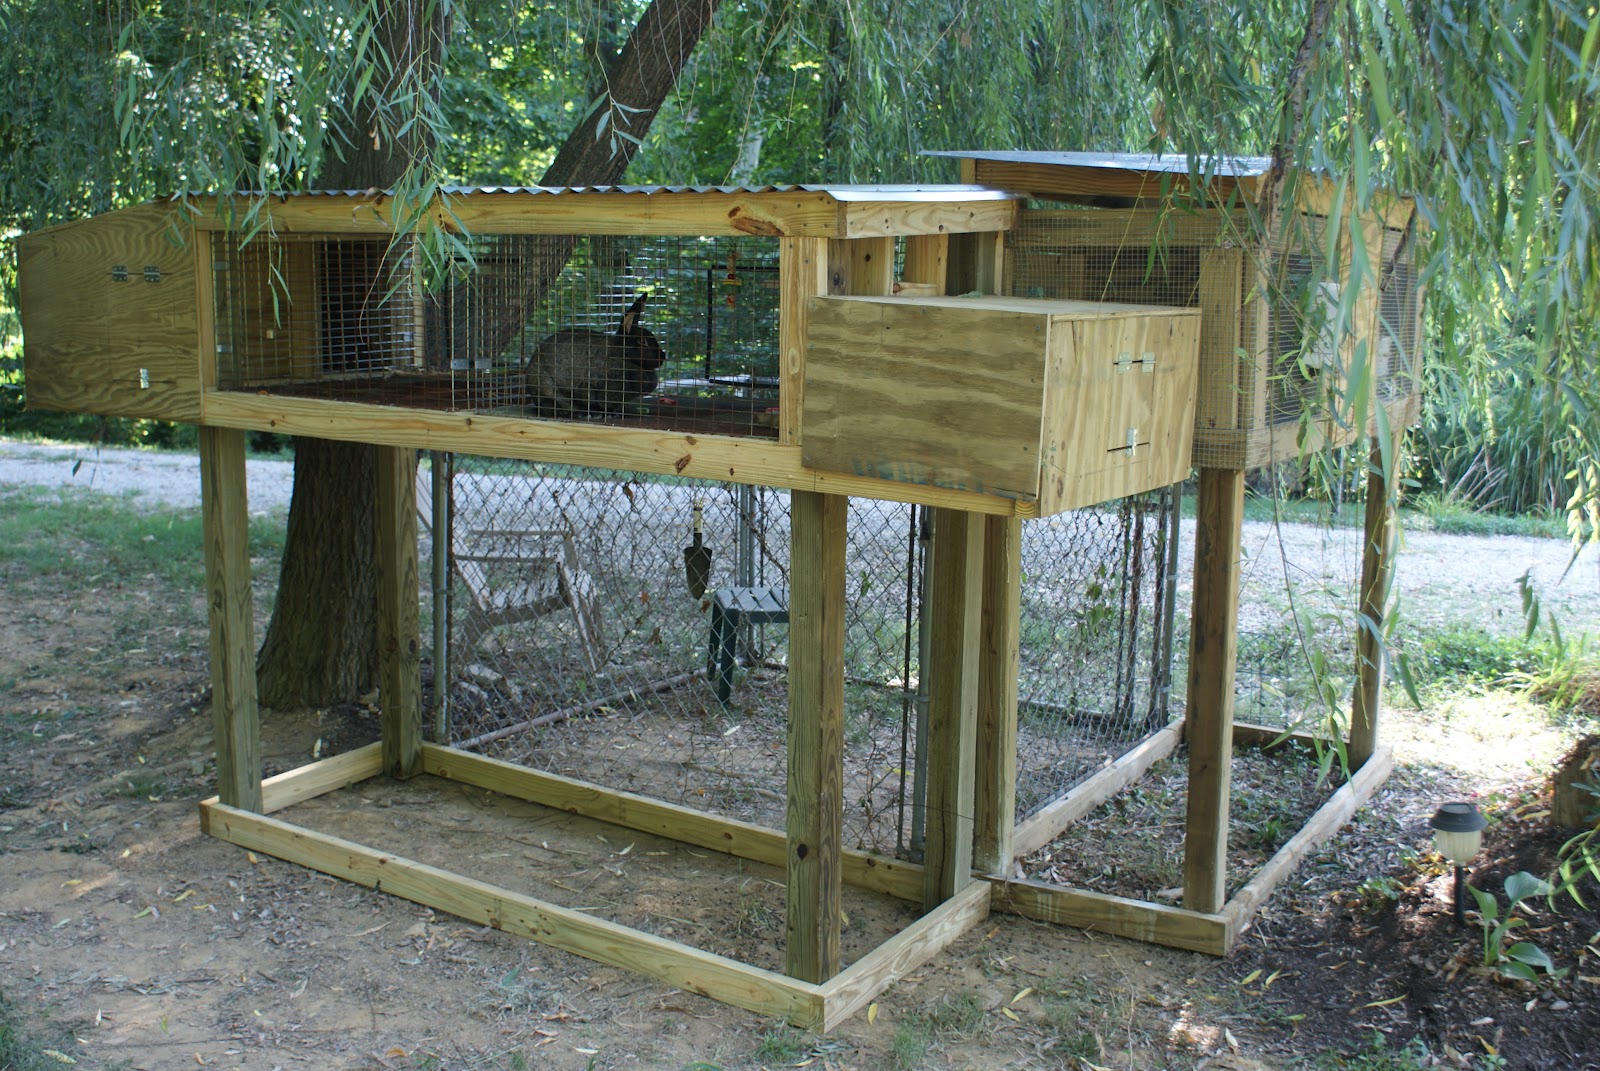
Here is a picture of the finished project. This is the front of the area!

Here is a picture of the back of the area. As you can see my husband has built boxes on each side of the new addition! To the left will be the "chicken coop", complete with nesting boxes for the egg layers! We plan on creating a ladder for the chickens so that they can enter and exit their coop!

Last but not least, here is the newest addition to our farm, Dusty. He is a buck that we picked out from our favorite farm, 3G Farms! A special thanks to them for their contribution to this new addition!
So with the construction complete on our newest project on the farm, now my work begins. As soon as our temps begin to cool down a bit, I will be able to begin some landscaping for this area. I have already done a lot of research on shade plants and will continue my research in order to pretty up the newest area of our farm!
THERE ARE TREASURES HIDDEN UNDER THE WEEPING WILLOW TREE!
Happy Gardening!
Mindy
With a slight break in the temps this weekend, my very talented husband finished the new addition to our mini farm! My brother had given us a set of cages he received for free from a friend of his, and my husband's mind started working!
Here are the cages as we received them:

We then decided to move the location of Oreo and Daisy's cage in order for the larger addition to fit in this location well! We also had this small dog fence on our property as well. It had some vining weeds growing through it and my daughter worked to remove those. We are not sure if we like the fence in this area or not, we are giving it some time to see if it grows on us. If we keep the fence there, it will be an area for the bunnies to get some exercise and somewhat of a safe haven for the chickens. My husband had mentioned something about eventually building an enclosed area here, instead of using the fence.

Here is a picture of the finished project. This is the front of the area!

Here is a picture of the back of the area. As you can see my husband has built boxes on each side of the new addition! To the left will be the "chicken coop", complete with nesting boxes for the egg layers! We plan on creating a ladder for the chickens so that they can enter and exit their coop!
Last but not least, here is the newest addition to our farm, Dusty. He is a buck that we picked out from our favorite farm, 3G Farms! A special thanks to them for their contribution to this new addition!
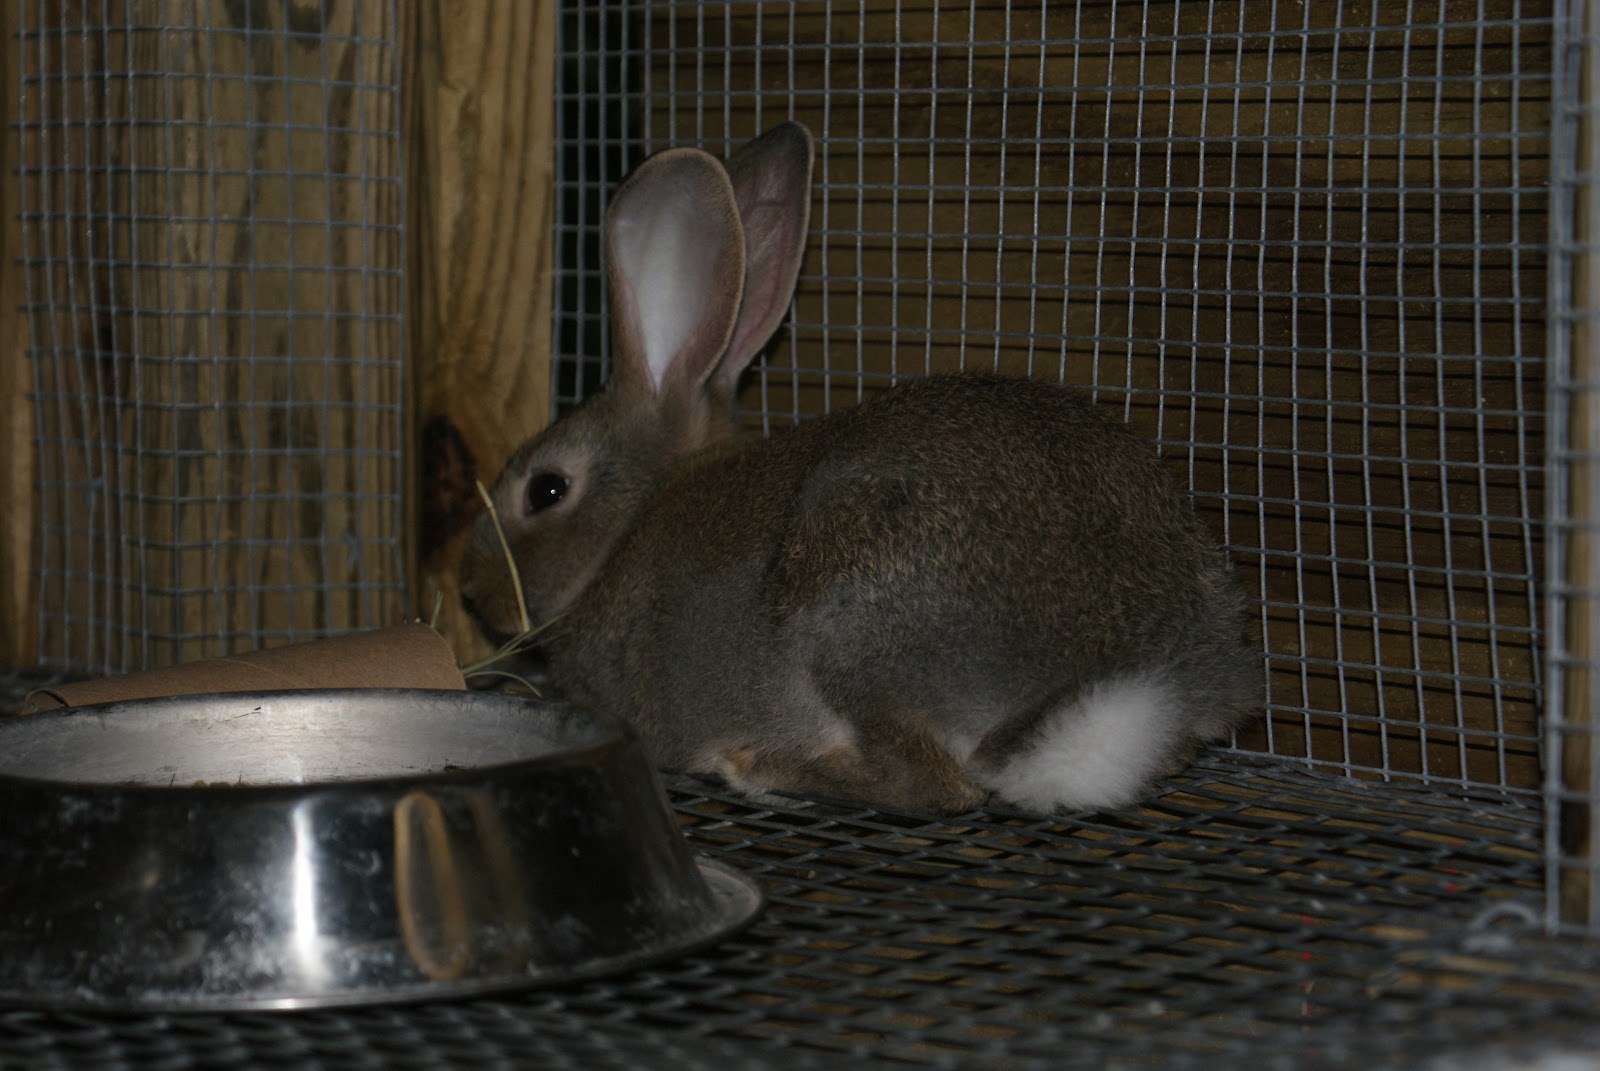 |
| DUSTY |
THERE ARE TREASURES HIDDEN UNDER THE WEEPING WILLOW TREE!
Happy Gardening!
Mindy
Monday, July 23, 2012
A CANNING FRENZY IN MY KITCHEN!
Wow are the veggies coming on or what?? I am having a great time harvesting all the veggies from my garden and then taking them in and deciding what creation I will come up with next! I have been doing lots of research from books and online looking for unique and good canning recipes! The internet is a wealth of information about canning and canning recipes! My kitchen has been transformed into a "canning" kitchen! I have everything set up to make the canning as efficient as possible!
With my more in depth gardening expedition this year by starting almost all of my vegetables from seed, seeds which individually cost just pennies on the dollar, it has been even more rewarding harvesting my veggies this year! I have really been motivated to do a lot of canning and spread those pennies even further! I am finding online and in many books that canning for self-sustainment is really on an increase with the rising prices of food in the stores. Canning allows you to know what has been added to your foods, as you are creating them yourself with no artifical additives. If you have never canned before, I urge you to give it a try! You do not have to fill your entire pantry with food, start off small with just a few small patches of different items, I bet you become hooked just like I did!
Here is some more of my work:

These are some pickles I created using some Ball Kosher Dill Pickle mix I purchased at lowes last fall when the marked down all of their canning items! This was a great steal at 25 cents, regular $2.98. I was able to get 4 of these for $1.00. They are extremely easy to make as well and very good for the beginning canner who has cucumbers!

With my more in depth gardening expedition this year by starting almost all of my vegetables from seed, seeds which individually cost just pennies on the dollar, it has been even more rewarding harvesting my veggies this year! I have really been motivated to do a lot of canning and spread those pennies even further! I am finding online and in many books that canning for self-sustainment is really on an increase with the rising prices of food in the stores. Canning allows you to know what has been added to your foods, as you are creating them yourself with no artifical additives. If you have never canned before, I urge you to give it a try! You do not have to fill your entire pantry with food, start off small with just a few small patches of different items, I bet you become hooked just like I did!
Here is some more of my work:
Below is Mrs. Wages salsa mix. This is a very easy mixture to work with, all you have to do is dice the tomatoes, combine the ingredient packet with the tomatoes and some vinegar, cook for ten minutes, place in sterilized jar and to the hot water bath canner for 40 minutes. This is a very good salsa!

These are some pickles I created using some Ball Kosher Dill Pickle mix I purchased at lowes last fall when the marked down all of their canning items! This was a great steal at 25 cents, regular $2.98. I was able to get 4 of these for $1.00. They are extremely easy to make as well and very good for the beginning canner who has cucumbers!

Happy Canning and Happy Gardening!
Mindy
Saturday, July 14, 2012
NATIONAL CAN IT FOWARD DAY! YOU CAN CAN!
Happy "National Can It Forward Day!" I was very busy on this special day of celebration! If you haven't ever tried canning and preserving your own fruits and vegetables, I will tell you one thing, "YOU CAN CAN!" It is an amazing way to use the extra fruits and veggies you cannot eat and is absolutely awesome to be able to enjoy these foods in the winter, when the garden is covered in snow!
![]()
![]()

I purchased this very handy new Discovery Set that Ball offers, and it is amazing for small batch canning and has all the items you need (except for pectin and fruit) to create a "canning masterpiece"! Ball has really created a unique product to get people to give canning a try! I highly recommend this product for beginners and small batch canners as well!

Today in the kitchen I made: Traditional Salsa (A special thanks to my husband for helping me dice up all the onions and tomatoes that I needed), Cherry Preserves, more Strawberry Preserves, Kosher Dill Pickles, and Jalapeno Jelly!
For those of you who have never tried Jalapeno Jelly, I know it sounds a bit bazaar, but it is really good! You can take a cracker, a bit of cream cheese, and then top it with some Jalapeno Jelly! Yum! Yum!
Happy National Can It Forward Day!
Mindy
Monday, July 9, 2012
WHEN IT REALLY HOT OUTSIDE, I GET REALLY BUSY INSIDE!
THE DOG DAYS OF SUMMER HERE IN SOUTHERN INDIANA!
While we have sure had some hot and humid days so far here in Southern Indiana and are definitely lacking the rain we need, I have been really busy harvesting and working in the garden early in the morning and working inside the rest of the day! The harvest have been good!

After harvesting my veggies, I took a trip to a local orchard here in southern Indiana and got some wonderful peaches! With these peaches I made some sliced peaches in syrup, some Peach Cobbler Bread, and 14 jars of peach preserves! I also made 4 jars of strawberry preserves with some strawberries I had purchased.

I made several mini loaves of Peach Cobbler bread and Grandma Bagby's Pumpkin bread!

I made some special deliveries to several very special families with some of my mini bread loaves and preserves! I saw lots of smiling faces!
What a days worth of very rewarding work!
Happy Gardening and Baking!
Mindy
Wednesday, July 4, 2012
A GREAT 4TH OF JULY SUMMER RECIPE

What reminds me of the 4th of July??? When the big tomatoes start turning red! While I have had cherry tomatoes turning red for a little while now, it is not until the "big" ones start turning that I feel it is truly summer!

I would also like to share a recipe that I have made today for the first time. This recipe is featured in the cookbook from Gooseberry Patch called "SUMMER IN THE COUNTRY".

BLT MACARONI SALAD
("SUMMER IN THE COUNTRY" - PAGE 167)
16 oz. pkg. macaroni, cooked
1-1/4 c. celery diced
5 green onions, finely chopped (I used 1/4 c. finely chopped Vidalia onion)
1 tomato, diced (I used several cherry tomatoes, diced)
1-1/4 c. mayonnaise
5 t. white vinegar
1/4 t. salt
1/8 t. pepper
GARNISH: 1 lb. bacon, crisply cooked and crumbled
In a large bowl, combine macaroni, celery, onion and tomato. In a separate bowl, combine remaining ingredients except bacon;pour over macaroni mixture, tossing to coat. Cover and chill for at least 2 hours. Just before serving, sprinkle with bacon.
Serves 6 to 8

The ingredients are fairly easy to prepare!
Salads are very good and refreshing to have during summer get togethers!
 I will be combing the bacon into the salad once it is time to serve! ENJOY!
Tuesday, July 3, 2012
STUFFED MUCHO NACHO JALAPENO'S
My Park Seed Mucho Nacho plants that I started from seed this past winter are coming along well! They are producing some nice, big jalapenos. These jalapenos are great, as they are on the mild side of the heat spectrum, which makes them great for this recipe. Yum!
STUFFED MUCHO NACHO JALAPENOS
 |
| This picture was taken about 20 minutes before they were done baking! You want to the bacon to be completely cooked and brown on the edges! |
1 dozen Mucho Nacho jalapeno peppers or other jalapeno pepper of your choice
8-oz pkg of shredded mozerello/cheddar blend cheese
1/2 lb bacon, halved
toothpicks
toothpicks
Slice jalapenos lengthwise without cutting all the way through. Remove seeds and veins. Stuff with cheese; close back up. Wrap a half-slice of bacon around each jalapeno and secure with a toothpick. Bake at 350 degrees for 45-50 minutes or until bacon is cooked and cheese is melted.
This is a great party appetizer as well as an awesome side dish to go along with any dinner!
If you have any great jalapeno pepper recipes or any other great summer recipes, I would love for you to share them here on my blog! Thanks so much!
If you have any great jalapeno pepper recipes or any other great summer recipes, I would love for you to share them here on my blog! Thanks so much!
Happy Gardening and Cooking!
Mindy
Tuesday, June 26, 2012
PENNYROYAL MASTER GARDENER DAYLILY CLASS AND GARDEN TOUR


This past weekend I drove to Madisonville, Kentucky and attended and class and tour put on by the Pennyroyal Master Gardeners at the Hopkins County Extension office. This class was on daylilies! It was an amazing time, I learned so much, and even picked up some more daylilies for my collection! My girls also went along with me and had a great time learning as well. The class was on everything daylilies, including the subject of hybridzing, to which I am very interested. I learned a lot and want to send out a special thanks to the Pennyroyal Master Gardeners for putting on such a great event. After the class we toured one of the master gardeners gardens, and boy does she love daylilies! I wanted to share a few pictures I took of her amazing garden!
Happy Gardening!
Mindy
Monday, June 18, 2012
THE MASTER CARVER AT WORK AGAIN!
As those of you who follow my blog know that my husband is very good at creating masterpieces in my garden; however, he also has another past time of which he very talented at . . . . . MASTER CARVER!
He has been making turkey calls and competing in national level competitions at the National Wild Turkey Federations for many years! He has several awards to show for it!
We have been taking very enjoyable drives to the river to collect driftwood for some of his work! On one of our trips he found a piece of driftwood which was very unique and he carved me an amazing piece for my living room! I thought I would share it with you!

He carved the face into the piece of driftwood! He is very talented and definitely has an eye for carving! I am so happy to have this piece made by him!
Sunday, June 17, 2012
HOW AMAZING IS THAT!!!!


And then BAM!

And then after his meal, he looks just as happy as can be! He definitely thinks he has a great "spot" for hunting! We just helped him out a bit! Guess we'll have to watch for him in the future. My daughter's gecko will have to share her mealworms with Mr. Toad!
Be sure to look in your garden for hidden little creatures like this one! You might just find them where you least expect them!
Happy Gardening! Mindy
Sunday, May 27, 2012
THE HEAT IS ON!!!


Happy Gardening!
Mindy
Thursday, May 10, 2012
FIRST A MISTAKE, THEN AMAZING! SQUASH FOR DINNER

As in an earlier post, my seed starting knowledge was a beginning level this year! After much research and what I thought was great planning, I started my Park Seed Organic Early Summer Crookneck Squash and Park Seed Early Spring Burpless Cumber seeds indoors under a grow light on February 26th, 2012. As many of you experienced seed growers know, that is much too early for squash and cucumbers. You can only imagine my dismay when I realized that my plants were growing far to fast for any reasonable outdoor planting time. With my big gardening "heart", I could not just destroy the seedlings, so on April 9th, 2012 I placed my seedlings out in my garden for the adventure of their lives! I babied them and covered them at even the slightest talk of frost! In my mind I just knew they would not make it. However, to my surprise, with the help of the extremely warm spring we have had, THEY DID MAKE IT!! On May 7th, my family had squash for dinner! I can't believe it. They are doing so well and are producing a very large amount of squash! I have read that it is best to harvest them when they are younger for higher overall yields from the plants!

My garden is doing very well! I have added many plants to my collection. I was able to attend our local Master Gardener plant sale and purchase some new plants. For my garden I have an Abraham Lincoln Hybrid tomato plant (bottom left on outside of fence) and a Sweet Marconi pepper plant (bottom right on outside of fence). I am excited to see how these do!

My peas finally bloomed and are producing pods. They took much longer than I anticipated, perhaps I did not allow for germination time when counting the days! I direct sowed these on February 20th.
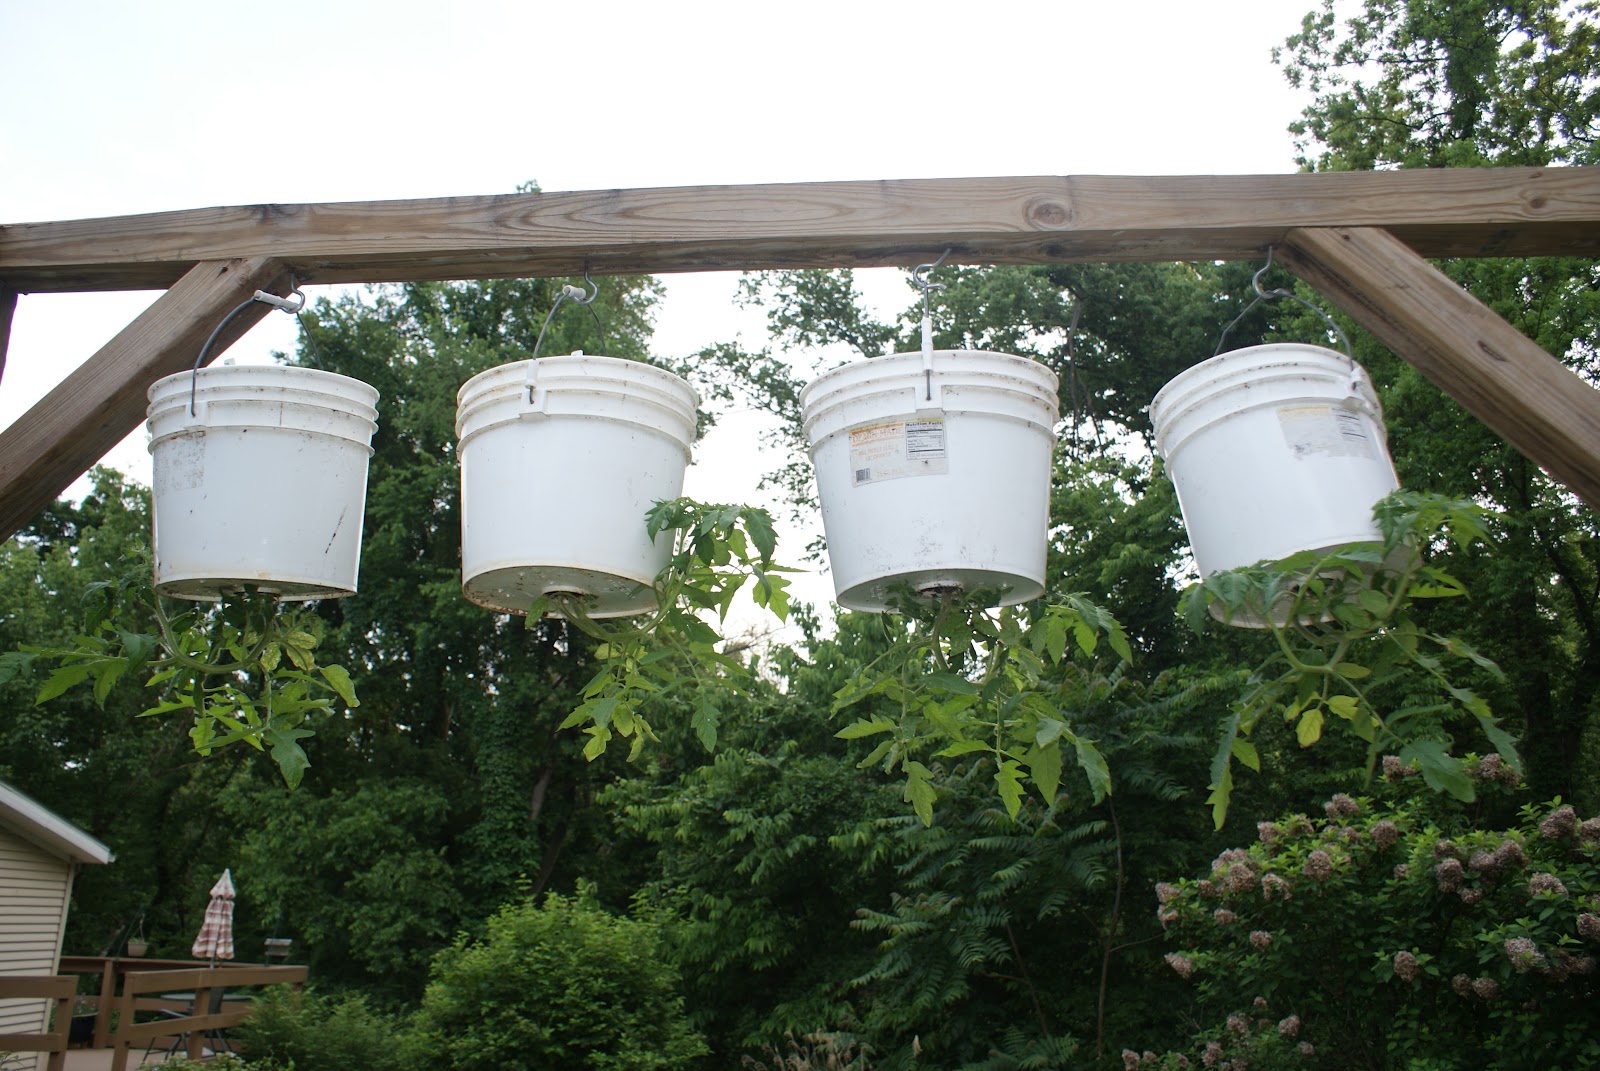
My hanging tomato plants look great! These were planted and hung the middle of April! These particular plants are my (Burpee Big Boy) tomato plants. This year I have planted 24 tomato plants in my garden! I only purchased three of the tomato plants. The rest of the plants are my own seedlings that I started in February and there are a few that were volunteer plants that came up in my garden and I just couldn't bear to destroy them, so I gave them each a nice new home in my garden! The volunteer plants are Husky Cherry Tomato plants!! They are very healthy and "husky" looking plants that produce great cherry tomatoes!
Best of luck in your garden!
The Ebullient Gardener!
Sunday, April 22, 2012
THE LABORS OF LOVE!
 There can be no other occupation like gardening in which, if you were to creep up behind someone at their work, you would find them smiling.
 ~Mirabel Osler
Here is a recent picture of my gardening area! I spend so much time in this wonderful area that my awesome husband has created for me! It is definitely a wonderful therapy to be able to nuture tiny seeds to thriving plants that will become food for my family. I am evolving this great area on a daily basis and will keep pictures posted so you all can see how it is doing! I have direct- sowed beans, well as more squash and zucchini. The cooler weather has slowed down the germination process and I am still waiting for the tiny seedlings to emerge! I am having great luck with Kale, Broccoli, Cabbage, and my peas are still coming on strong but have not bloomed as of yet! Many things are changing in this wonderful garden!
Happy Gardening and Best of luck to all the gardeners out there!
Mindy
Thursday, April 19, 2012
PLANT YOUR TOMATOES WHEN THE PEONIES AND BLACK LOCUST BLOOM!

I have been acquiring a great deal of gardening knowledge by reading Jerry Baker's Book Terrific Tomatoes, Sensational Spuds, and Mouth-Watering Melons. This book is completely full of great advice and old-fashioned wisdom for gardening! I have actually taken a lot of the information I have read and created a "cheat sheet" with the hints, tips, and information all on one piece of paper. I then laminated this piece of paper, front and back, so that the paper can be taken to the garden with me when I am working! Jerry's Grandma Putt always told him to plant your tomatoes when the Peonies and Black Locust bloom, and that is just what I did. I had my transplants hardened off and ready for planting just in time! My tomatoe plants have come along well, and I was very excited to get them in the ground. As many of you know I also plant my tomatoes in handing buckets upside down! I have also planted some plants in the ground as well. I am hoping for a great crop of tomatoes this year! Time will tell!
I also followed the advice of the additives Jerry recommends to use when planting each plant. In the hole where I was planting each tomatoe I included some compost and well-rotted manure, a handful of Bonemeal, and a teaspoon of Epsom salt.
He also advises to water your tomatoes with fish fertilizer two weeks after transplanting, after the first flowers appear, when fruits are golf ball size, and when first ripe tomatoe is spotted.
If you get a chance, check out Jerry's book, you won't be sorry that you did! I have learned a lot and will put it to the test this year to see how the advice works!
Friday, March 30, 2012
MAGNIFICENT MARCH 2012 - VEGETABLE GARDENING

My Vegetable garden is also coming along well!
Top Left - Yes, these are cucumber and squash plants. (Park Seed Organic Early Summer Squash and Park Seed Cucumber, Early Spring, Burpless).
I started these plants indoors with my other plants. However, with my lack of experience with seed starting, the date of 02/26/12 was way too early to start these plants indoors! I did not have the heart to just kill them, so I decided to give them a try outside. With the warm weather we have been having they are doing quite well so far, not sure what the future brings for these
Top Right - Kale, Dwarf Blue Curled, Vate's Strain (Ferry-Morse). I have already had a harvest from this Kale in which I made some yummy Kale and Lentil Soup, for which I came up with the recipe myself!
Center - In the large bed my husband and I have transplanted my Broccoli (De Cicco), Brussel Sprouts (Catskill), Cabbage (Copenhagen Market, Early), Cabbage (Crisp and Cool). In the small bed are my Radishes (Cherry Belle).
Bottom Left - My Lettuce (Grand Rapids) is ready for harvest!
Bottom Right - Spinach (Bloomsdale, Longstanding Heirloom) is also very close to harvest time!
Happy Gardening!
Mindy
I am linking up with Tootsie at Tootsie Time for "Fertilizer Friday"
Check out all the wonderful blooms and excitement at http://www.tootsietime.com/
See Part II below (Flower Gardening)
Subscribe to:
Posts (Atom)